

Foam Printmaking with Kids and Horse Mask Template
- megumiwat
- Mar 23
- 3 min read

As most people know by now, 2026 is the year of the horse, and during the biggest school holiday in Australia (Dec~Jan), I did horse mask making workshops at local libraries for kids aged 5-12. This activity is fun to do even for adults, and very easy.
Tools & Materials
Foam Sheet A4 size for one mask
Cardstock Paper for Printer A4 size
Block Ink / Relief Print Ink (water based) *You can try with acrylic paint or poster paint but since the consistency of the paints differ depending on brand, it's more straight forward with block ink.
Printmaking Roller / Brayer - 10cm is recommended
Burnishing Tool with a Flat Surface - read below where I explain..
Scissors
Craft Knife
Glue or Double Sided Tape
Hole Punch
Elastic
Newspaper
Pop Stick or Palette Knife
Paper Palette or Flat Waterproof Surface such as baking tray (will no longer be useable for cooking after this) or plastic plate, or inside of a tetrapak.
Apron or an old t-shirt to protect your clothing
Paper for Test Printing


Above LEFT: Foam - even small pieces can be re-used as stamps, or other craft projects, so keep them ;)
Above RIGHT: Esdee Lino Brayer / Roller 10cm can be found around A$18


Above LEFT: Derivan Block Ink can be found in smaller tubes. Speedball Block Printing Ink is harder to find in Australia. They are both A$10-$15
Above RIGHT: For burnishing, you will need something that fill fit in your or your child's palm, with a flat surface (no grooves of any kind). People use spoons, but it is harder to print with spoons, as they have less contacting surface. If you have 2 brayers, you can use a clean roller for burnishing.
Instructions
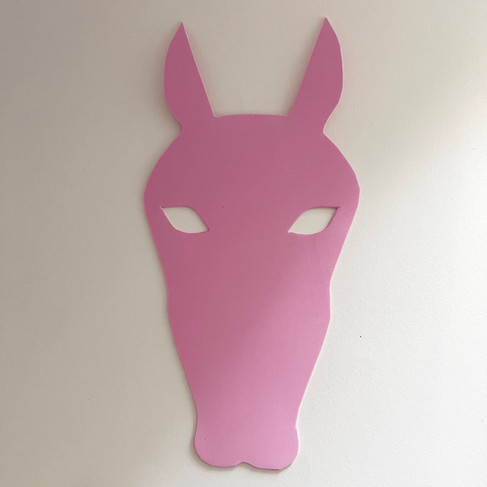
Download the below jpeg Horse Mask Template and print on A4 cardstock paper.

Cut out the head, ears and eyes at solid lines. Cut a slit at the red solid line at the base of the ears, and fold them at the dotted line. Slide the ears onto the head and glue or tape them down. Make holes where the dots are, with a hole punch.
Place the above mask on a foam sheet and trace the outline with a pencil onto the foam. You will not need the tab bits on the foam. Cut the foam at the lines or slightly (1~2mm) inside the lines (this will avoid a messy printing process later). Cut the eyes out with a craft knife.


Now a step even a little child can do :) Draw patterns on the foam with a pencil. When going over the drawing lightly with a finger, you should be able to feel the bumps for it to show up clearly, but no need to push very hard with pencil. Please be aware that the pattern will show in mirror image when printed.

Put on your protective layer of clothing and take out some ink onto your choice of palette. Dab the roller / brayer into the ink and roll to spread the ink flatly to the entire width of the roller by rolling back and forth, then from right to left, making a square on the palette. It is important to lift the roller each time so the ink will go on the roller evenly. Now ink the foam with the roller, adding more ink as necessary. (The foam can be used to print multiple times. I suggest to test print on a separate piece of paper the first time.)
Place the paper mask on top of the foam by lining up the eyes, then using your choice of burnishing tool, rub by putting a little pressure from top. Make sure the paper does not slide or move around when doing this, or the patterns will be blurred. Lift the mask gently away from the foam, and let dry. Once dry, tie a piece of elastic to the holes and done!


Please message me if you would like me to make a kit with pre-cut foam and mask, with brayer, ink, and a tray.


Comments